How to create a brain that uses the OpenAI API
Introduction
On this tutorial you will learn how to create a brain with conversation and voice transcription capabilities using the OpenAI API.
Prerequisites
- Node.js (version 14 or higher)
- HubAI CLI
- A HubAI publisher
Creating the brain
After installing the HubAI CLI, run the following command to create a new brain project:
hubai brain create
Choose the brain-ts template and fill the required information. When asked for the brain capabilities, select "Conversation" and "Voice transcription". The publisherName should be the name of the publisher that you created on the prerequisites.
A folder with the name of your brain will be created, go to that folder and run the following command:
npm run package:dev
This will generate a .hext file in the root folder of your project. This file is the development package of your brain.
Installing the development package on HubAI app
Open the HubAI app, go to the "Brains" tab, click on the "+" button and select the .hext file you just generated:
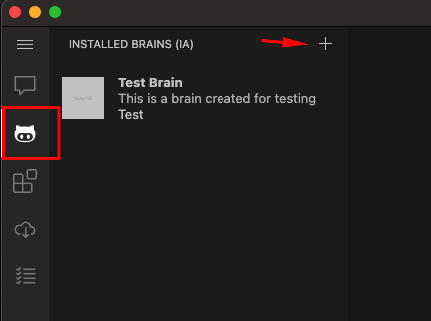
Restart the app and you will be ready to use your brain.
Testing the brain
You can skip this step if you already know how to test a brain
To test the brain, first start the brain server by running the following command on the root folder of your brain project:
npm start
Now go to the HubAI app, start a new chat, select your brain and send a message, you should see the response from the brain:
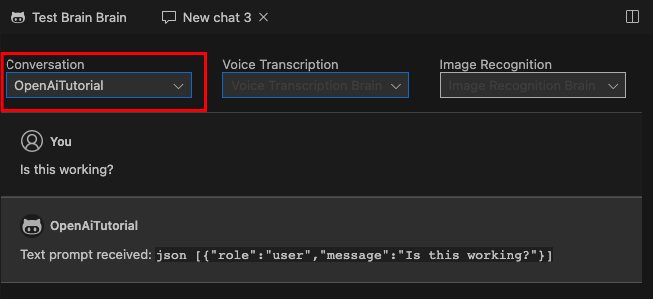
Now go ahead and edit the src/brain.ts file, change the result of the sendTextPrompt method to something else and save the file.
sendTextPrompt(
    prompts: TextBrainPrompt[],
    context: IBrainPromptContext<ISettings>,
  ): Promise<BrainPromptResponse> {
    const validationResult = this.validateSettings(context.settings);

    return Promise.resolve({
      result: 'I just changed the return message:\n ``json \n' + JSON.stringify(prompts) + '\n``',
      validationResult,
    });
  }
Your brain server will automatically apply the changes and you can test it again by sending a new message on the HubAI app
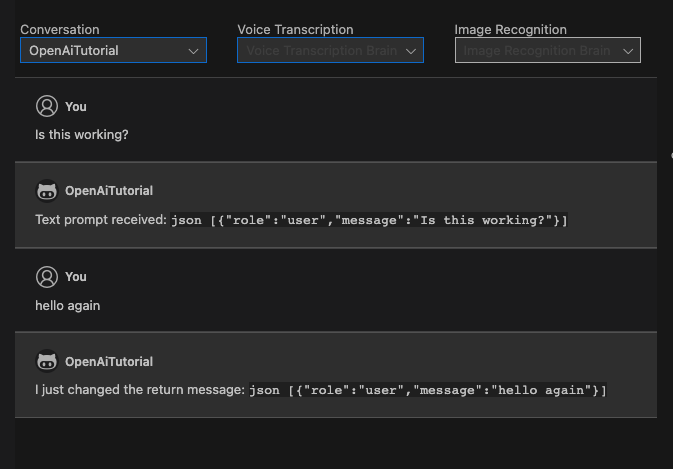
Installing the OpenAI API package
We will use the @tectalic/openai package to interact with the OpenAI API, so let's install it:
npm i @tectalic/openai
Creating the brain settings
Adding the settings to the brain
The OpenAI API requires a few settings to work, like the API Key and the text-model to use, so let's add them to the brain.
Open the src/brain.ts file and edit the ISettings interface to add the required settings:
export type ISettings = {
  apiKey: string; // Required
  textModel?: string;
  audioTranscriberModel?: string;
  audioTranscriberDefaultLanguage?: string;
};
Now we need to add the settings into the package.json file, open it and edit the "brain.settingsMap" array with the settings:
"settingsMap": [
    {
        "displayName": "OpenAI API Key",
        "name": "apiKey",
        "type": "string",
        "required": true
    },
    {
        "displayName": "Text Model",
        "name": "textModel",
        "type": "string",
        "required": true,
        "defaultValue": "gpt-3.5-turbo",
        "enumValues": [
            "gpt-3.5-turbo",
            "text-davinci-003",
            "gpt-4"
        ],
        "scope": "chat_overridable"
    },
    {
        "displayName": "Audio Transcription Model",
        "name": "audioTranscriberModel",
        "type": "string",
        "required": true,
        "defaultValue": "whisper-1",
        "enumValues": [
            "whisper-1",
            "whisper-2"
        ],
        "scope": "chat_overridable"
    },
    {
        "displayName": "Audio Transcriber Language",
        "name": "audioTranscriberDefaultLanguage",
        "type": "string",
        "required": true,
        "defaultValue": "pt",
        "enumValues": [
            "pt",
            "en",
            "es"
        ],
        "scope": "chat_overridable"
    }
]
The settings name must match the name of the property on the ISettings interface.
The scope property defines where the setting can be changed, in this case we want the user to be able to change some of the settings directly on the chat window, so we set it to chat_overridable:
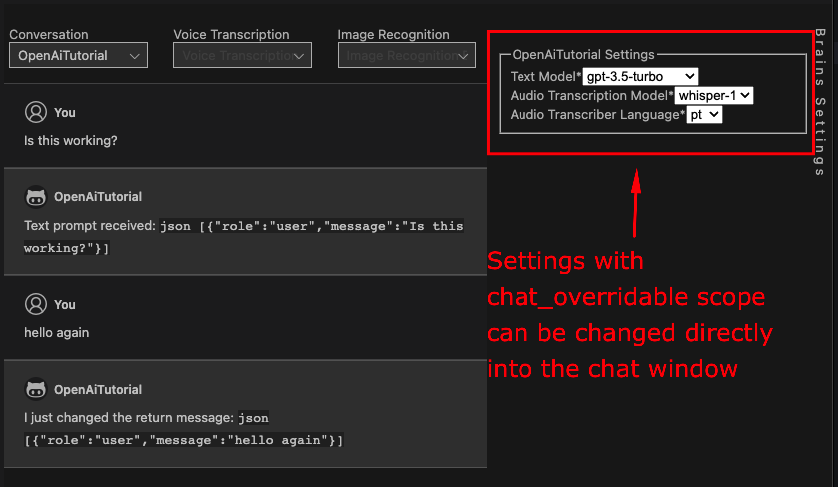
You can learn more about the settingsMap on the LocalBrainSettingMap documentation.
Everytime that we change the package.json file we need to generate a new dev package and install it on the HubAI app again, like we did on the Installing the development package on HubAI app section.
npm run package:dev
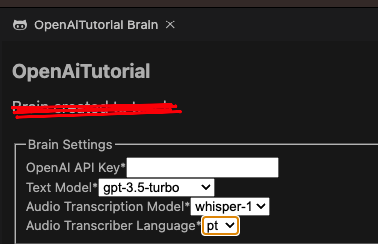
Now if we go to the brains tab and click on our brain, we should be able to see the settings that we just added:
Validating the settings
Now that we have the settings, we need to validate them before using them on the brain.
To do that, we will change the validateSettings method on the src/brain.ts file. This method receives the settings and should return a BrainSettingsValidationResult object.
In this example we will check if the API key is valid and has at least 10 characters:
validateSettings(settings: ISettings): BrainSettingsValidationResult {
    const validation = new BrainSettingsValidationResult();

    if (!settings?.apiKey || settings.apiKey.length < 10) {
        validation.addFieldError('apiKey', 'API key format is invalid');
    }

    return validation;
}
Using the OpenAI API
Now that we have the settings validated, we can use the OpenAI API to send a text prompt and get the response.
Import the openai package on the src/brain.ts file:
import openAiSdk from '@tectalic/openai';
Change the sendTextPrompt method to use the OpenAI API:
sendTextPrompt(
    prompts: TextBrainPrompt[],
    context: IBrainPromptContext<ISettings>,
  ): Promise<BrainPromptResponse> {
    // First we validate the settings
    const validationResult = this.validateSettings(context.settings);

    // If the settings are not valid we return the validation result
    if (!validationResult.success) {
        return Promise.resolve({
        result: validationResult.getMessage(),
        validationResult,
        });
    }

    // We create the params to send to the API
    const params = {
        model: context.settings.textModel,
        messages: prompts.map((m) => ({ role: m.role, content: m.message })),
    };

    return openAiSdk(context.settings.apiKey)
        .chatCompletions.create(params)
        .then((response: any) => ({ // Return the OpenAI text response in the result field
            result: response.data.choices[0].message.content.trim(),
            validationResult,
        }));
}
Since our brain also has the voice transcription capability, we also need to change the transcribeAudio method to use the OpenAI API to transcribe the audio:
async transcribeAudio(
    prompt: LocalAudioPrompt,
    context: IBrainPromptContext<ISettings>,
  ): Promise<BrainPromptResponse> {
    // First we validate the settings
    const validationResult = this.validateSettings(context.settings);

    // If the settings are not valid we return the validation result
    if (!validationResult.success) {
      return Promise.resolve({
        result: validationResult.getMessage(),
        validationResult,
      });
    }

    // We create the params to send to the API
    const params = {
      file: prompt.audioFilePath, // The path to the audio file
      language:
        prompt.language ||
        context.settings.audioTranscriberDefaultLanguage ||
        'en', // The language of the audio file
      model: context.settings.audioTranscriberModel, // The model to use for the transcription
    };

    // We send the request to the API
    const result = await openAiSdk(
      context.settings.apiKey,
    ).audioTranscriptions.create(params);

    // We return the result
    return { result: result.data.text, validationResult };
  }
Testing the brain
Lets start the brain server again by running the following command on the root folder of your brain project:
npm start
Now lets try to send a message into the chat window on the HubAI app:
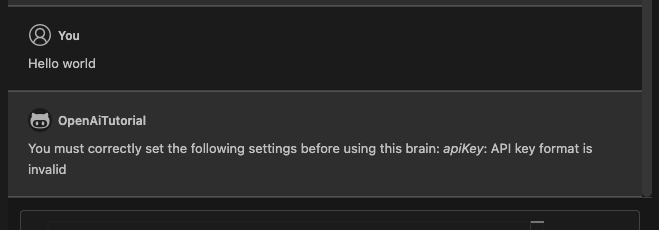
As you can see, the validation failed because we didn't set the API key on the settings. Go to the brains tab, click on the brain and set the OpenAI API Key setting. You can also change the other settings if you want.
Save, and try to send a message again:

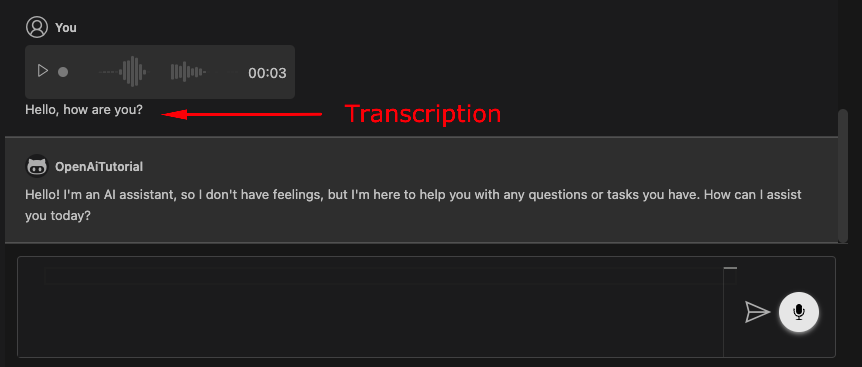
You can also send a voice message to the brain and it will automatically transcribe it using the OpenAI API (and the transcription will be used on the text prompt): (Don't forget to select your brain on the VoiceTranscription setting in the chat window)
Here's the result of a voice message saying "Hello, how are you?":
That's all folks!
You can check the full code of this brain on the brains-example repository.
Publishing the brain
Now the last step is to publish your brain to the HubAI registry so other users can use it (Don't publish this brain, it's just an example).
See the Publishing a brain to learn how to publish your brain.